
Llama forge Ant Controller
Introduction
The Llama Forge Ant Controller is a product developed for the use in UK/Australian 150g Combat robots.
This product aims to improve on the capabilities of the original Malenki-Nano controller while reducing size and weight.
The following will be brief documentation on the functions and set up of the controll board.
Saftey
- Lead: This product contains lead (Pb) in the form of solder and components used on the board. After Soldering and handling this product be sure to was hands thoroughly with warm soapy water.
- Fumes: Ensure that soldering environment is in a well ventilated space with good airflow to avoid inhaling fumes.
- Fiberglass: The PCB material is made from layers of copper and fiber glass with the addition of other harmful chemicals. Do not cut file or grind at the board as this will produce dust that can be harmful.
- Short circuits / Polarity: Before first power up after making changes to the connections, double check all connections have the right polarity (+ and -).
Failure to do so increases the risk of short circuits or reverse polarity current which will destroy the board and connected components including batteries.
Quick Start
- Solder N20 brushed motors to Left motor and Right Motor (Orange and Yellow)
- Solder ESC Power + and – make sure polarity is correct.(Blue)
- Solder ESC signal to PWM 1 (Pink)
- Solder switch Inputs (Green)
- Solder LED Make sure polarity is correct. 10k Resistor included on board. (Purple)
- Solder Battery input + and – make sure polarity is correct (teal)
- Double check polarity is correct for Battery, LED and ESC Power.
- Ensure there is no weapon attached to the motor and the motor is properly secured.
- Power on control board.
- Hold down bind button on transmitter and power on transmitter.
- Board and transmitter should now be linked
Documentation
Features
3 x Brushed Motor Driver
2 x PWM Output for ESC or Servo
1 x Output for 3.3V Led
1 x ESC Power Output
1 x Switch Input
This board contains a inbuilt Power distribution board to help reduce complexity of Wiring in the robot. (This board does not contain a breathless ESC, only the power distribution for it.)
Pinout
WARNING:
PLEASE ENSURE THE POLARITY (+ AND -) OF THE BATTERY AND ESC CONNECTION IS CORRECT.
Double check before first power on.
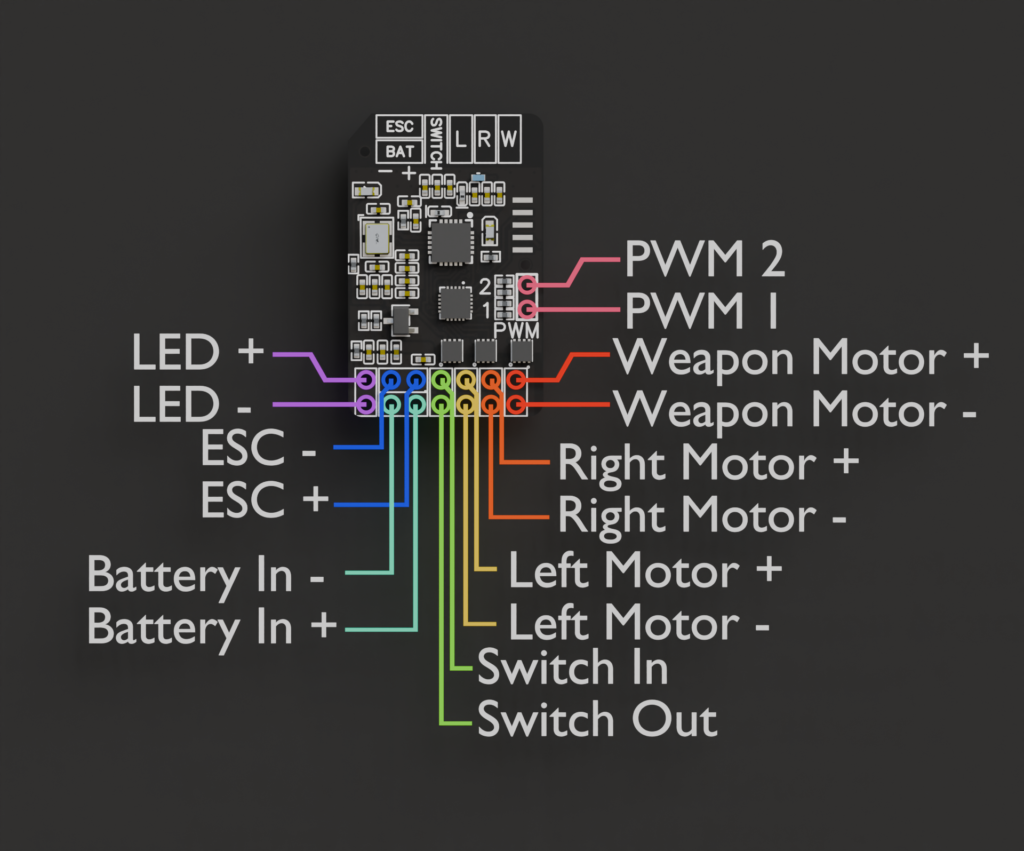
Wiring Diagram
The Llama Forge Ant Controller board uses opensource firmware from the Malenki-
LED Indicator
The Ant controller has 2 LED indicators located on the board.
LED 1: LED will be a solid red when the board is powered and control system is booted up. When working normally this LED should be powered on at all times. If this LED does not power it could mean that the board has lost power or there is an electrical issue with the board.
LED 2: LED will flash at 50% on and off when the controller board is ready to bind to a controller. Once bound to a controller the LED will be on permanently.
Config mode: LED 2 will flash rapidly.
Channel Mapping
1 = Steering
2 = Throttle
3 = Weapon Motor
4 = PWM 1
5 = Invert Steering / Configuration Input
6 = PWM 2
When your robot is turned upside down you can use channel 5 to invert the controls of the robot to allow for normal steering and throttle.
Configuration
Configuration Mode allows for slight changes to the controller operation.
Configuration mode can be entered with the following steps:
- Turn the control board off
- Turn the transmitter off
- Turn the control board on
- Wait 5 seconds
- Turn the transmitter on
The control board should now have a rapidly flashing LED and be in configuration mode.
The switch for channel 5 can now be flipped on and off x number of times to toggle different settings.
2 = Invert Left output.
3 = Invert Right output.
4 = Invert Weapon Output.
5 = Reset Control Settings.
6 = Enable / Disable Mixing.
7 = Factory Reset (Unbind).
8 = Swap Channels 3 & 4
9 = Enable / Disable Braking
10 = Enable/Disable Servo Stretching
You may need to map channel 5 to a switch if not bound on the controller already.
Acknowledgments
The Llama Forge Ant Controller board uses opensource firmware from the Malenki-Nano project.
Documentation can be found at:
Original Malenki-Nano Documentation
The acknowledgments from the original Malenki-Nano team will be passed on here as this would not be possible without for the previous work from this project.
“
I would like to thank the following people in no particular order:
- User “essele” on EEVBlog forum – for https://github.com/essele/kicad_jlcpcba -which generates the BOM and location data for JLCPCB
- Flemming Frandsen – for https://gitlab.com/dren.dk/kicad-util which generates mouse-bites for panelising PCBs
- “MrAardvark” for pyupdi.py https://www.avrfreaks.net/users/mraardvark
- Which is used to program the microcontroller.
- Deviation TX firmware authors, and especially “goebish” on deviationtx.com forum
- Who reverse engineered the AFHDS2A protocol and provided me with assistance in getting telemetry working
- Reading Hackspace directors and members for making an excellent place to do development work and giving technical help.
- Enzo from Reading Hackspace for lending me a transmitter during lockdown
- Joe Brown of the Bristol Bot Builders for being a beta tester and agreeing to stock them on the shop
- Ben (from Team Panic) for video reviews / demos
- Scott Siegel for amazing levels of enthusiasm and ideas
- All the UK Antweight builders for being creative and generally cool, and being formidable opponents!
“
Change Log
V1.1
+ Added coloured silk screen.